"Kitty Shuffle"
Study #1 in quick cat quilts
(Pictured below on the left, seen with "Soft Kitty, Warm Kitty")
both originals made by Lynette Caulkins
48 x 51 inches
fabrics: "Miss Kitty's Colors" by Marie Cole for Henry Glass plus unknown white background
Hobbs poly batting
quilted on a domestic Husqvarna Sapphire 875Q
TUTORIAL FOLLOWS
Now, I say this is an original design, because I sat looking at the scraps I had left of "Miss Kitty's Colors" and came up with two of my own ideas. In the last week, I've seen three different kitty head quilts very similar to this, so it's not "original" in the sense of being unique.
My desire was to have simplified quilts that could be finished easily in a weekend. This design makes a quick, cute, crisp-looking gift that takes advantage of a person's scraps on hand. It's also perfect for pre-cuts such as a layer cake or a fat eighth set.
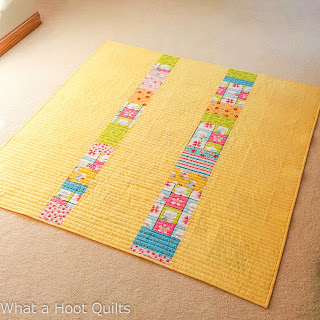
I adore the crispness of a white or very light background. It's fantastic to pair with a great color for the back, too. Here I used a pretty yellow from my stash, which wasn't quite big enough on its own.
I had just enough length of yellow to back the quilt from top to bottom. But the quilt is wider than uncut fabric. As you can see, I simply sewed a couple columns of scraps together to insert so that the fabric would be wide enough. Super cute! And that let me include some of the super cute block feature print that I didn't care for on a kitty face.
That yellow was perfect for the binding as well, which was machine sewn - that approach fits this style of quilt very well, and I like to use it on children's quilts. I attached it to the back, then wrapped it around to the front and sewed it down with a very fine topstitch line.
"Kitty Shuffle" looks great just as it is, or the faces could be embellished with whiskers, eyes, and any other features wanted.
~*~ "Kitty Shuffle" Tutorial ~*~
This quilt is extremely easy to make. You will need 25 kitty heads, some spacers and rows of background, and that's all. You may use this free quilt pattern for personal quilts and gifts, and may change it up any way you like. If you do use it, I'd love to see what you made linked up below.
You can also redo the sizing if you want it smaller for a baby, or add more blocks for a twin size bed cover. This is a great sofa size for a child. For an adult I would probably go to 6x6 grid for a quilt that's 57 x 61 inches, or a 7x7 grid for a quilt that's 66 x 70 inches. (If you're using this tutorial's dimensions, add or subtract 9 inches to the width per head, and 9-3/4 inches to the length.)
CUTTING
From your scraps or pre-cuts:
25 face parts: 6.5 in. wide by 5.25 in. tall (pay attention to the orientation of directional prints)
50 coordinated ear pieces: 2.5 in. squares (cut two of these for each one of the faces using the same fabric)
From your background fabric: (I used 1.75 yds. of white)
25 head pieces: 2.5 in. by 6.5 in.
30 spacers: 3.5 in. by 7.25 in.
6 background rows: 3.5 in. by 48.5 in.
CONSTRUCTION
First make your heads:
These will finish at 6 x 6.75 inches
Sew the ears to the head piece of background. I did zero marking on this project. The ears can be as wonky or straight as you please. (If you'd like to go wonky, you may like cutting your squares larger so you have room to play with angles, and then trim after things are pressed open.)
I wasn't going for wonky, but I wasn't about to fret over preciseness. I simply laid a square right-sides-together on one end of a background piece and eyeballed the diagonal as I sewed from one corner to another.
Then you lay the second square of that fabric on the other end and sew a diagonal, making sure it's direction is opposite from the other squares - you do not want to make a parallelogram. You need this trapezoid shape in the end:
Also make sure you keep directionals and strips oriented the right way to your seam. I folded mine back as I went, so I could make sure the stripes would run the same as each other AND horizontal, as they do in the face pieces. Stripes can be tricky, so double check before you stitch.
I like to reap freebie half-square triangle units when doing this kind of piecing. To do so, just run a second line of stitching about 1/2 inch further toward the cut-off corner. You'll be cutting the extra corner off between those lines.
Press as you like. I knew I would quilt through all horizontal seams, so I did NOT press mine open. (Also, I don't like the seam allowance showing through white fabric on a quilt top.) I pressed the seams toward the cat heads. Nothing is small enough to create troublesome bulk. If you're going to use a different quilting approach or have a desire for perfectly flat flocks, press your seams open. It's all personal preference. :)
Now do the "Shuffle" part and find a layout that pleases you:
This is a great task to let your kids help with. Or your cats.
Lay the heads in a 5x5 grid and shuffle them around to find a good balance of color and contrast. Leave it there and see what you feel about it a couple hours later. Take pictures so you can go back to previous layouts if you want. Step back and squint - are there areas that just go blah with too many darker or lighter or same-color blocks?
Add your spacers:
Once you have the layout you like, work in rows to sew your vertical spacers in. You will need 6 spacers for each row of 5 heads.
Sew all your rows together:
Now you're ready to finish your top! You will have 6 background rows alternating with your 5 kitty rows. It's a good idea to backstitch the beginning and end of each of these seams.
*QUILTING*
This design is perfect for the modern straight-line approach. I pin-baste my quilt sandwiches, so I placed my pins in horizontal rows between the long seams so I wouldn't have to move them before several lines were already quilted in. That way there was no stopping while sewing!
I used my walking foot with the presser foot tension lowered from 6.0 to 3.5, lengthened the stitches from 2.0 to 3.0, and set my machine to needle-down mode (so when I lift off the foot pedal, the machine stops working with the needle in the all-the-way-down position to keep from losing the exact spot when I start going again).
Then I went to town with unmarked work.
I first sewed right on the long seam lines where the background was joined to the kitties and and also where the ears were joined to the faces. Then I divided and subdivided the sections that were created by eyeballing divisions that would get me about 5/8 inch widths between the first quilting lines. I did not fret about exactness. It came out GREAT as a whole. I used 50 weight thread that matched the background.
While this is a very fast quilting solution, you don't want to put the pedal to the metal and race as fast as your machine goes. Even with a walking foot, that will contribute to those yucky pulling wrinkles we get on our quilts if the layers slip a bit. (This is also why I lowered the presser foot tension.)
This design would do very well with any number of all-over free motion motifs. Or you could get fancy and quilt in whiskers, eyes, nose-and-mouth, and do some echoing.
In any case, it's absolutely cat-approved. Navarre has loved it every step of the way,
and even the elusive Clara had to come and enjoy it.
If you make a "Kitty Shuffle," go ahead and link it up here. This will remain open indefinitely.
~*~*~
Take a look at the other projects I worked up from the "Miss Kitty's Colors" collection. If you might be interested in taking on the Henry Glass challenge, their information is included here. Don't let it intimidate you - I am just a normal private quilter, and I also had a much longer deadline than the usual 3 weeks, so I went a little crazy with my work. :)
#1 - "Love from Above for Emma" - original design
#2 - Jaycee's messenger bag
#3 - "Kitty Titty Power" with ruler tip
#4 - Miss Kitty Winter Receiver
#5 - Travel packing bags
#6 - "Kitty Shuffle" - original with tutorial (you are here)
#7 - "Soft Kitty, Warm Kitty" - original with tutorial
#2 - Jaycee's messenger bag
#3 - "Kitty Titty Power" with ruler tip
#4 - Miss Kitty Winter Receiver
#5 - Travel packing bags
#6 - "Kitty Shuffle" - original with tutorial (you are here)
#7 - "Soft Kitty, Warm Kitty" - original with tutorial
~*~*~
I'll be linking up at:
I'll be linking up at:


Ok Lynette....that is too adorable....I am definitely going to make a mini one of these but will pin on pinterest in the meantime. I love your kitty models...infact everytime I visit your blog, I take a moment to goggle at them on your header...I think I am kitten smitten!
ReplyDeleteThis is just TOO cute! I'm bookmarking THIS post, and making a note of it in my notebooks, aka my brain, so I don't forget! Thanks so much for the tute! XO
ReplyDeleteSew cute! I'm really partial to the kitties and anything cat related. Especially fond of that black kitty, we took in many very sweet black kitties over the years. Only 1 left in my house now.
ReplyDeleteHi Lynette thankyou so very much,i love this its so cute xx
ReplyDeleteLove your kitties, fabric and fur xxx
ReplyDeleteI love cats!
ReplyDeleteThanks for the tutorial!
Such a sweet quilt and I know a couple of my granddaughters would love this , thanks for the tutorial , I came via Cath and will be back.
ReplyDeleteThis is such a great way to use novelty prints. Thanks for sharing how you made it.
ReplyDeleteI am really enjoying your series this week & I think this is my fave! How sweet of Clara to make an appearance.
ReplyDeleteAnd thanks, now I have soft kitty warm kitty buzzing through my brain ;)