Quilt ADD in therapy

My photo
Colorado, United States
Other than my family, the passion of my life is quilting. An eclectic, I love a wide variety of styles and techniques encompassing both machine and hand work. I am a longarm quilter who can work for you. I enjoy any style, from pantographs to all-over to full custom, ranging from traditional to modern. I love bringing vintage tops to life and am willing to work with a challenging quilt top. Instagram: lyncc_quilts
Showing posts with label Finishes. Show all posts

Friday, May 6, 2022

Finish Report! King-sized Dinner Plate Dahlia


king-sized "Dinner Plate Dahlia" - a Judy Niemeyer design
116 x 108 inches


This is a Judy Niemeyer design. I extended the outer edges on the papers of the queen size pattern to make it the size we wanted for our king bed.


I started piecing this in September 2019 and finished the top in March 2020.


This is my own colorway, which I figured out on Quiltster's site. I ordered the Japanese florals and the sky blue border fabric, then supplemented those from my stash.

It went onto my longarm in late August 2021, and came off early March 2022. Quilting was slow-going because I was still limited by long-Covid effects, I had a hard time deciding what to quilt where, and - well - at 108 x 116 inches, it's a MONSTER. And, as I found, the very widest backing that I can get onto my frame.


I used 11 different threads on the top, and 3 bobbins. I do one thread at a time all the way through a quilt, change the thread, roll back the other way, repeat as necessary. That way I minimize tension adjustments. I've found that stabilizing the quilt with the ditch work and basting areas that are larger than a fist as I go along (I just use corsage pins for that) prevents any pleats from happening on the back as I roll back and forth through the rest of the process. 

The only collaboration on this is when Navarre "helped" me figure out a template for the long gray feather areas. 


And now, I'll just let the close-ups speak for themselves. This is all ruler and hand-guided. I do not have a computerized system.


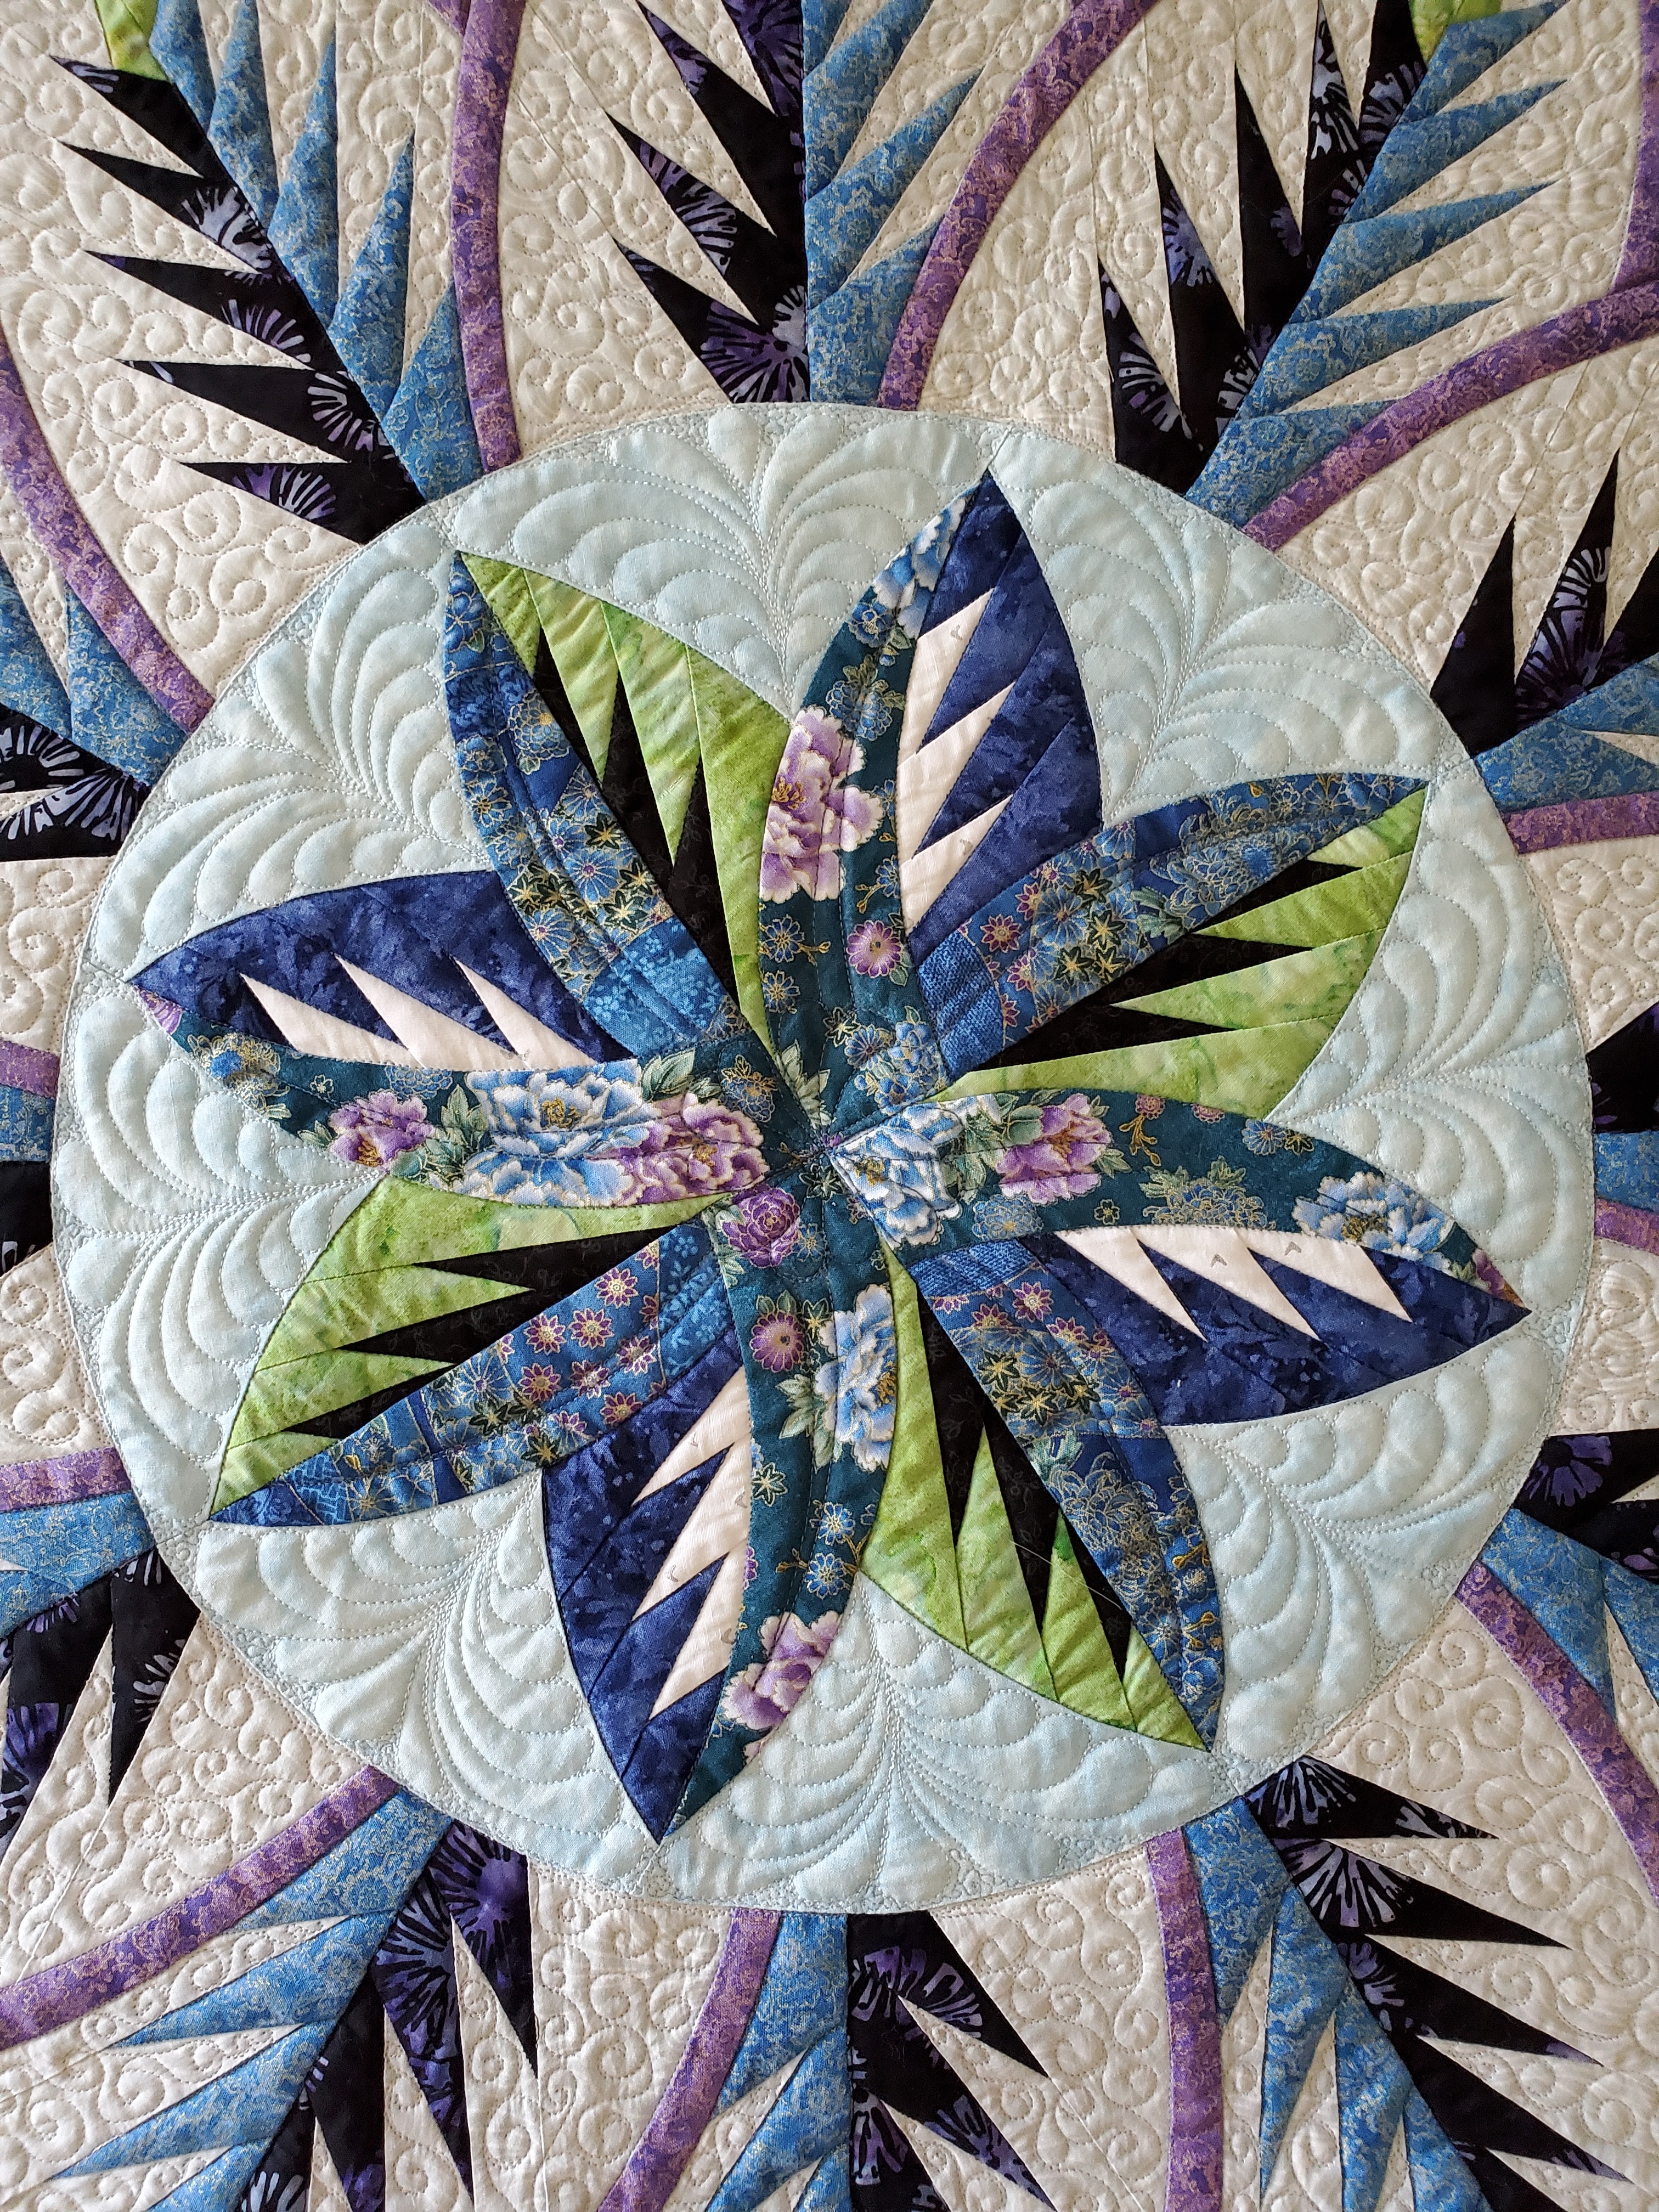


And Isabeau has been convinced this is her personal quilt, ever since it went onto our bed March 3rd. 

  I am sharing at TGIFF


Monday, October 4, 2021

BOMs Away - A side trip into the jungle for a ~ FINISH ~ report!


Welcome to the Link-up for BOMs Away Mondays!

Where we share what we're doing on a BOM type project
so they don't stall out in UFO-land!
(Linky at the bottom)


I didn't do any BOM work this week. (again)   I wanted to finish up the baby photo op quilt that Devon asked me to make. 


She wanted a jungle theme to match her nursery, and green instead of white background. It so happened that I had the perfect fabric in my stash for that.  

It was super gratifying to find every single thing I needed for this in my stash and "scrap" bins. I even pulled those balloon colors from my Temperature Quilt stack!


Since this is not a quilt for normal kiddo use, I took the opportunity to use the bit of high-puff poly batting that has been lurking forever in my batting cupboard. I hate poly in quilts - it makes me sweat like crazy, even when it's thin and the temperature's very cold. Plus, it's not good to use it in baby/children's quilts, as it melts onto their skin in fire situations (and Dad is a firefighter!).  But this quilt is only going to be laid on once a month for a photo op.

I did use pin-basting quite a lot to control that high puff!


I was quite amazed that I didn't have a (big enough) green on hand that I liked for the backing. I mean, I have a huge bin of green yardage in my stash! The only one that was the right shade was strongly Christmas, so that was a no-go. I do have four large bins of fabric given to me last month by a person who knew she would not be quilting anymore. It includes five pieces of cotton chenille fabrics, and one of those was a pine green that played superbly with this. So I thought, what the heck? Let's see what happens if we use this.

It quilted just fine. I wondered if it would give me tensioning fits, but it didn't! I was able to whip along at my regular "scribble" speed to put all that leafy/curls fill. 


The chenille did make the machine's high-speed operation sound subtlely different - more thrumming-ish. Surprisingly, my husband even noticed that when he passed my workroom one time! 

It also makes the finished quilt, with that medium-dense fill and poly batting, feel like a bath mat! So I wouldn't use something like this on a quilt meant for bed use or snuggling. Although. . . it's nice and heavy feeling, and would work very nicely as a weighted quilt for a sensory person who likes those! (I would use cotton batting, though, so it flows better.)


I just cut single-fold binding strips from the backing overage, same as I would with minky on the binding. Cutting it 1-3/8 inch wide worked perfectly, and it wasn't hard to stitch the back side down. 

I made the changeable numbers by fusing black fabric onto black 80/20 batting. 


I printed out a font I liked in the size I wanted, glue-sticked the numbers onto the top of the fabric, and cut out around them (then popped off the paper). Worked like a charm. The intention is that the batting will grip the fabric in the sign so the numbers don't shift around for the photo, like a felt board. Of course, when Baby's moving around a lot later on, that could be tricky to capture. heh!  

Now we just need a baby! Any day now - perhaps even any hour!!!


~*~*~*~

Have you worked on any BOM type projects recently? We'd love to see your progress!

Kate over at Katie Mae Quilts has joined me in hosting this meet-up, and linking up from either end puts you on the party at both sides 


You are invited to the Inlinkz link party!

Click here to enter

Friday, August 27, 2021

Finish Report! ~ "It's a Silky Wool Flannel Kind of Day" ~ Aug OMG

  I've had my August OMG finished for a week now, but have had a lot of trouble getting true-to-life photographs. I'm giving up and posting anyway.  :) 


At 48 x 62 inches, "It's a Silky Wool Flannel Kind of Day" is perfect for a September sofa cuddler. Our evenings get nippy here starting - well, now - and I'm loving the feel of this so much. 

Plus, this has a very unique binding that I absolutely adore.

I call it, "Puffed Silk Binding," and that will link you to the page describing how it was done.


In August 2017, my daughter gave me a wonderful jelly roll from the Maywood "Woollies Flannel" collection, and that November I sewed it up jelly race style, randomly inserting parallelograms of the gold Silk Radience I'd bought for its backing.


This April, I quilted it up using the pantograph, "Autumn Oaks" from Willow Leaf Studio. I usually do custom quilting on my own quilts, but once in a while they are better suited for all-over designs. This fall theme gave the quilt a gorgeous organic feeling that really elevated the jelly race "blah" feeling to a scrumptious quilt finish.


I used washable silk batting! I wondered if the thickness of the wool flannel would take away the charm of the silk batting's hand, but it's a very nice combination, particularly with the silk backing. (Although, the silk on silk *did* want to slip around during the quilting, so you have to be aware of that tendency while working.)

This is how shiny the silk actually looks.  :)


All this quilt's lusciousness (and the fact that it's mine and will get only gentle laundering on occasion) just begged for an unusual binding treatment - something softer than traditional binding or knife-edge, but not as substantial as a beaded-flanged binding. Something soft right on the edge itself.

So I wondered about doing a puffed binding. I couldn't find anything online like what I saw in my mind's eye, so I experimented on a mug rug.

Still need to finish this up. . . 


I'm putting together a tutorial, but all I did, really, was cut the silk radiance binding strips slightly larger than normal, so that I had an extra 1/4 inch of slack in the applied binding once it was stitched down on the back. After that, I spent TV time cinching the poofs down one by one all the way around. I found that 7/8  inch was a great spacing for this, and used 50wt Aurifil thread (single strand, double stitched and knotted on the back before and after each puff's cinch). 


The result is exactly what I'd pictured, and so very perfect on this quilt.  Next is to see how well it holds up over the years, but it feels very stable. Silk Radiance has a slightly stiff, but very flowy, hand when you're working with it this way, so it stands up nicely in the puffs. Regular quilting cottons (or, say, dupioni silk) would just fold in on themselves without puffing much - you would need something inside, like tulle, to give the puffs body.


So, yes, I would do a puffed binding again on the right quilt.  :)

Note to self: Embroidery with a single strand of 100wt silk was not the easiest!


This was the perfect quilt to develop the binding technique on - all the individual components came together in a way to make the whole so much more than the sum of the parts! Who thought a jelly-roll race would make such a remarkable finish?


LINKING UP at

Sarah's Whoop Whoop Fridays

TGIFF

 Elm Street Quilts for the August Finish Report 


Thursday, July 1, 2021

Finish Report! ~ Marissa's Home Quilt ~

 Yesterday I finished the binding for Marissa's wedding quilt:

Pattern is Kim Diehl's "Journey's End," fabrics are her "Katie's Cupboard" collection. 
65 x 65 inches, Hobbs Heirloom 80/20 batting

I love doing custom quilting. Usually, the fancier the better, as far as I'm concerned. Once in a while, though - Less is More. 

I'd intended to do some roofing and siding lines in the houses, and then some fill work in the background of the blocks. However, when I started doing that with one of them, it detracted from the quilt instead of enhancing it. The houses are very busy with the dozens of different prints and the piecework of the blocks in them. Putting more quilting in mushed things together rather than highlighting them. So . . . I stuck with "just" stitch-in-the-ditch on the blocks with one 1/8-inch echo around the windows. That simple work did a lot to bring out the features in the houses, so that the center of the quilt no longer melted into itself.


On the sashing, I simply ran lines straddling the thin stripes in the fabric print. Looks great!


In the border, I wanted the white bricks to stand out better than they did before the quilting. To highlight those, I threw in some continuous-curve quilting, then I ran some fun leaves-and-vine-curls free-motion style through the colored bricks, treating them as one field on either side of the white bricks.


I loved this teal print from the collection, so I'd bought enough to make the whole backing with it, and the binding frames the quilt with the same fabric as the sashing.


I'm very happy with how the quilting enhanced this top. It felt a little too busy for its own good beforehand, but the subtle-yet-effective strategies in quilting brought it up to its full potential. It's a great scrappy quilt with a wonderful old-timey heart-is-where-the-home-is feel.

Marissa surprised me by choosing this quilt top for her special quilt. I didn't expect the reproduction fabrics and highly traditional pattern to appeal to her taste, but the top really called to her. It makes me happy when a quilt I've made resonates with others.  :)  


I'm linking up at:

TGIFF at Storied Quilts this week


Thursday, April 1, 2021

Finish Report! ~ Scott's "Morning Stroll" ~

I get caught up with actual quilting work and forget to do my finish posts!  Last week I finished the second of the pair of row quilts for my husband to take to his office:


"Morning Stroll," designed by Marie Noah.
  42.5 x 14 inches, single layer Hobbs Heirloom 80/20 batting


I wanted the quilting of the sky to feel like morning waking up with the sun coming over the mountains, so dramatic rays and a few clouds for interest were the order of the day.


These quilts all have block patchwork integrated into the design, and this one gave me fits trying to figure out how to do the detail quilting I like to do in those areas. At first, I was planning to quilt it in the mountain/center/lake-and-ground layers. But it wasn't floating my boat very well. 


Then my mind went back to the moon motif detailing in the patchwork of the first Marie Noah row quilt I did for Scott (Night Watch), which inspired me to do something on the entire pieced area that echoed the idea of morning sunshine bursting onto the world. 


I'm giving all of these row quilts the same outer border motif with the oak-leaf inspired free-motion work, and like the moose quilt, I let the main characters (bear in this case), give me an idea for the mini border. So these guys got a continuous line of fish for breakfast!


I forgot to snap a shot of the label. Most often, I make a text box in Word so I can print something out on prepped fabric. Sometimes I'll put in a coordinating picture, and I did that with this one. You can see that I note the contribution of other people on my labels, in this case the design being somebody else's. My early quilts' labels included the name of the quilter if I sent them out for longarming. It's important to do this.


I really love these designs. When Scott came home the day he took it in and put it up, he told me he had a 90yo woman in the office who thoroughly enjoyed the 4 Marie Noah row quilts and the 4 other mini quilts of my own designs that he has up in the rooms there. She asked if she could see the others in the room she wasn't in, and asked him to make sure to tell me how much she loved them. She noticed little details on her own, like those fish in the mini border. That was neat to hear.  :)   


I'm linking up at:

TGIFF at TBA this week

Thursday, March 25, 2021

Finish Report! ~ Scott's "Moose Lake" ~

Here is the first of two row quilt finishes I will have this week!


This is a Marie Noah design and kit that I purchased from Northern Threads in 2018 at Scott's request. It finished at 40.5 x 14 inches, and I used a single layer of Hobbs 80/20 batting. 

I had this loaded in tandem with a sibling row quilt, and it took a surprisingly long time to quilt them up.  Not because of Covid "stuff," but because these mark the first time I've done the stitching-down of the fusible as the quilting itself, rather than stitching down the applique pieces at the domestic machine first. It works fine at a slow speed, basically as slow as the domestic machine on half-speed mode. I didn't have problems with sticky needle or pieces popping up. 


If you know me, you know I'm a thread enthusiast, spurning the invisible threads in particular on applique. I don't like the way the needle holes show up so much more with that. Instead, I use several colors in weights ranging from 40 to 100, depending on the effect I want, and this quilt has everything from Glide 40wt to Aurifil spools to Superior Microquilters. It takes me much shorter time now to do the side squiggling for tension adjustments than it did three years ago. Tension play was a huge ordeal at first, but now it's a half-minute task that doesn't faze me.

These row quilts give me the hardest time figuring out just how to quilt them, for some reason. Moose Lake wasn't too hard - throw some CC's on the patchwork at the bottom. . .


Do some pin-striping and oak-leaf inspired free-motion play for the outer border to simulate a carved wooden frame. . .


But what to do for the sky? It happened that our weather here on that day was a classic heavy-air mountain day, where everything feels pregnant with the possibility of snow, but the cloud cover is moving along and probably going to pass you up. So I thought I'd try to quilt that feeling.  

I put in clouds, then wind swirls up high, pushing them along, and then "heaviness lines" below. Those served the dual purpose of making the mountains and trees pop out nicely. While I was at it with that pale blue Microquilter thread, I put in snow-cap "floofs" on the mountaintops.

So now what to do with the mountains? I had envisioned something fancy with the log cabin piecework in them, but whenever I drew something on my overlay acrylic sheet, I hated it. It turned out that all they wanted was to be ditch-stitched. I did throw in some close-placed straight lines along the edges where background mountain peaks needed to recede behind the foreground peaks instead of just being one field of piecing. That worked very nicely! 


The stony bases were too big to be left open, as they puffed out too much to be background portions of the whole picture, so I wandered lightly, basically dividing the fabric's colorations. 

Most of the rest of the quilting was simply stitching down and defining the applique pieces, with some water lines in the lake portion. 

But that rust mini border puffed out unattractively for a wall hanging, and I didn't know what the heck to do there. So I just "wrote" in some stylized M's  - for "Moose," you know! (I did chalk in some 1" guidelines, then freehanded the M's between those all around.)


They turned out great! It just looks like another wooden-frame motif.

Wash and block, bind and throw on a label. . .


. . . and this guy's ready to join the two sibling row quilts that are already at Scott's office.  :)  


The second of these fun row quilts just needs me to stitch the label on after it finishes drying, so I'll be posting that one tomorrow.  

I'm linking up at:

Tish's UFO party
TGIFF at Storied Quilts this week