Quilt ADD in therapy

My photo
Colorado, United States
Other than my family, the passion of my life is quilting. An eclectic, I love a wide variety of styles and techniques encompassing both machine and hand work. I am a longarm quilter who can work for you. I enjoy any style, from pantographs to all-over to full custom, ranging from traditional to modern. I love bringing vintage tops to life and am willing to work with a challenging quilt top. Instagram: lyncc_quilts
Showing posts with label Batting. Show all posts

Friday, January 9, 2015

Finish Report - "Laurel Burch Christmas"

So here's my last finish of 2014, finally all photographed and written up:


"A Laurel Burch Christmas"


Can you see the snow falling in that photo? Perfect.  :)

And I've got Devon's fiance trained already for quilt photo-opping! He doesn't mind helping out at all, and has a good time doing so.


I love Laurel Burch fabrics - they're so whimsical and vibrant. This was a kit I bought in the summer of 2011, and pieced the top in December 2012 (the pattern is a free download here). It's been in the flimsy closet since then, poor thing!

This was put together with a fine, very soft all-cotton pin-wale Kaufman corduroy backing and "washable" silk batting. It's a much lower loft than wool or poly give, even lower than 80/20 cotton/poly. It's a nice match with the soft corduroy, though. I pre-soaked it, then did my usual partial-dry in the dryer, air-dry to completion approach to get most of its shrinkage out of the way before using it. I'm not sure how I feel about this batting - it dries up quite lacy, and I'm not convinced I'd like it with thinner backing or more open quilting. The top started at 56 x 63", and after quilting, washing, and blocking it to get my marking chalks out when it was finished, it measures 54.5 x 61.75". (I did not use the dryer at all on this finished quilt because of the silk, and I'd say it didn't shrink much more at all since a fair bit of the dimensions difference would have come from the quilting alone.)

I had fun with the quilting. I do that on my domestic table-top machine (Sapphire 875Q), and I pin baste liberally. With my Lupus, I'm extra susceptible to cancers, so I'm not going expose myself to the carcinogenic chemicals in the spray basters (you get that exposure both when you apply it and all the time that you're quilting).

After stabilizing the quilt with ditch stitching along the borders and around each corner tree and ornament, I attacked the borders first. (I used Aurifil 50 wt threads for all but the metallics, and in the bobbins when I used those.)


Those were so easy - I used the walking foot to quilt the divisions between colors, then the spring-action free-motion foot to outline the characters. I didn't start and stop for each character, but came along the bottom line of the color strip and "stepped into" the field at the back of each character to work that one as I work along the strip. Oh - the itty birds in the narrow red strip were not individually outlined.


The word lines in the top and bottom borders got set apart with a metallic gold thread. It's much sparklier than it appears through the camera's eye:


"Magic & Merriment" - so perfectly describes Laurel Burch's work, don't you think?

The corner trees were next, where I used a specialty stitch to make metallic gold garlands, and then I tried my first McTavishing for those backgrounds so that the trees would puff out nicely: 


You can see that better from the back. Obviously I can use some practice with that motif, but I'm not unhappy with the turnout on this quilt.


Then I moved on to the ornaments, where I quilted each type differently from the others, using a silver hologram thread which turned out super sparkly (but the camera can't see that very well at all).

Black kitties got vertical spheroid lines in a snowflake stitch:


White kitties got horizontal lines alternating between a holly stitch and straight stitches:


The purple love-bird ornaments got vertical spheroid lines in lavender thread, with the hologram thread outlining the bird families:


Green deer ornaments got dark green quilting along the swooshy lines in the print, and then hologram outlining on each deer:


And the stags got black outlinings on the "star" of the show, with a hologram fancy-stitch ornament focal outline and straight-stitch horizontal sphere lines. There was one blue stag and a terrific White Stag:


I thought the gold hangers on the ornaments needed a wee touch of something, so I put in a fancy stitch using the same metallic gold thread that I had used when I outlined the word strips in the top and bottom borders.


Last, I tackled the main background, where I put in a free-motion doodle with holly leaves, berries, and ribbon curls:


The pattern called for jumbo rick-rack for the ornament strings, but I'd wanted something more sophisticated for this particular quilt. So I used some of that braided velvet gimping. LOVE it! It was absolutely perfect for this.


But you have to be meticulous while working, because one touch of the hot quilter's iron, and you have this little melted scar forever more. Not going to make me cry, though! It will practically never be found by any of us over the years as we use this.


For the binding, I used the faux-piping technic with a gold accent line inside the same red as the central background:


I love how this quilt turned out! The corduroy makes a really nice weight for winter evenings, and was a request of my husband's back when I pieced it. We didn't get to use it this year, since it wasn't blocked and dried until after Christmas day, and photo-opped after New Year's. But I'm so excited to lovingly stack it with the other two finished Christmas quilts to await full usage for the next holiday season!


~*~*~*~*~*~*~
Linking up at:


Shannon's KISMIF

Can I get a Whoop! Whoop!


TGIFF is at Quilt Matters this week
 (main site here)

Wednesday, January 16, 2013

Tutorial for Scalloped Bindings and Comments on Piecing Batting.

Hand Work Station

Yes! Marissa's Moment of Caprice is finally at this station. That makes me super happy even though my Hawaiian mini is sooo close to being finished that it was a shame to have to set it aside once more. I love the back on this (seen here) as much as the front.


Let me say: Scalloped binding is gorgeous and I know I'll do it again for sure, but WHAT A JOB! Luckily I picked up a few tips from around Blogworld, and let me pass those along. 


  • You absolutely must use a bias-cut binding. You cannot go around those curves and inward corners with on-the-grain strips. 
  • The tip I picked up a couple years ago to starch binding shut on itself as you press the fold (this lightly "glues" the layers together so you don't get slippage puckers) was immensely beneficial for scalloped attachment.
  • Don't cut the scallops until you've attached all the binding. You lose a ton of stability on your sewing base if you turn that into bias as well. In a couple of the pics below you can see the blue-line edge I had traced onto the quilt top before quilting.
  • Another thing that really helped with putting on this binding is that I'd basted just inside that line (about 2 mm) when I was going to start my FMQ. 
  • You're going to need a lot of time for this task. It normally takes me 30-35 minutes to attach a twin-sized binding. This took several sessions (it's VERY intense work), and added up to just under 3 hours! So plan for that if you've got a deadline on a project. 
  • While sewing, you'll need a tool to hold the edge in place around those curves and to swing the seam allowance out of the way on the inner angles. Did your trusty Purple Thang get lost during a recent move? Grab a seam ripper. Worked great.


You don't need to fuss and worry about easing in fabric on the curves, but I found it extremely helpful as I approached those angles to lay in a pin parallel to the next curve's beginning, and 1/4" in from the edge line. 


Then I knew to stop the end of the curve I just made and pivot on my down-needle when I arrived at that pin. Just be careful to get your binding bent around that needle-down without stretching it. Be meticulous about getting the little folds that will form out of the way of the needle. You gotta get the next couple of stitches without going through any of those. If the needle does go through a fold, you really need to pull it all out from under the foot and pop out that stitch. Leaving it in will steal way too much of your binding from you for turning over the edge later. Trust me, it's worth the extra effort to fix that.


And you go along, doing the Dory thing - "Just keep swimming, Just keep swimming" - nice and slow, until you finally arrive back where you started and you do some funky Twister struggle to get a bumpless binding connecting seam in one tiny scallop space. That was an adventure, but happily successful.  :)


Even the quilt was happy that this part was accomplished! Look at it grinning away at me from where I set it down to await TV time and the scallop-trimming: 


Again, with that task - go slow! You don't want to slice through your stitches when you're cutting those inner angles!  Yeah, I was holding my breath a lot for those. It took 50 minutes to cut this twin quilt's scallops - Just so you know. You also want a nice, smooth edge.  You do NOT need to snip the angles into the point of the stitching to achieve pretty inner corners later. Let it stay stronger by keeping its seam allowance intact.

Also - I would stick to scissors for this task. A rotary cutter, even the tiny one, would be too risky at those inner angles.

All sources and quilters stressed to me that scalloped bindings really, REALLY need to be hand-stitched down. This was fine for me, as I only machine-finish bindings on baby quilts and quilts with super-thick backings like corduroy and minky.  This is another point you need to allow extra time for, though.  I had comforted myself during the attachment time that at least the hand-stitching part would be more regular in time demands. However! Judging by the distance I got while watching movies with my very sick 15yo - - - it will take a total of 9 2-hour movies to stitch this baby all down, compared to a usual 3 or 4 for this size. So..... all together, at every stage, you need to factor in much, MUCH more time to put on a scalloped binding. But they're worth it!

I was happy to find that the bias binding eases around the curved edges quite nicely after you practice a few. For me and my tastes, the 2 1/4 inch strips I sewed on were a perfect match for the 1/4" seam allowance I cut. I usually use 3/8" allowance on bindings, but with the curves I went a little shallower.

I found it easiest to stop pinning at the middle of a scallop and jump ahead to the next  angle. 

Fold the first edge flat like this, keeping a good tension at the stitches on the right.


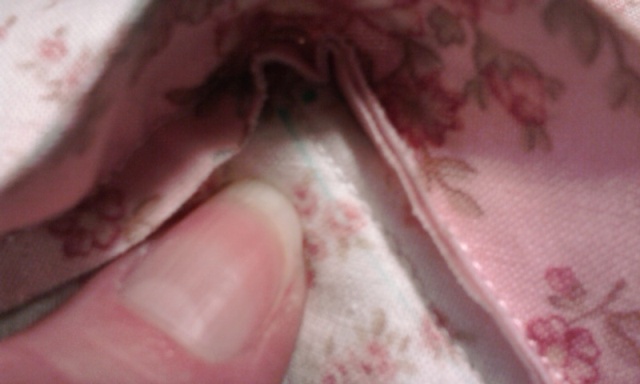
Fold the second edge flat like this, again making sure you don't have gapping at the stitches on that side. (Don't pull it all super-tight, just get it to the stitching.) You'll have a nice pleat running up the center of the angle.


Now you can bend the whole she-bang up at the edge.  You want to pinch the fold in place at the edge of the quilt while allowing it to spread back out on the edge of the binding that will meet the corner when you finish laying it down. My thumb is hiding the folded part that I'm pinching here:


Now lay it down flat on the point of stitching. You can see how the fold slid open so that it disappears right at the edge of the point, but remained in place at the inner angle. All this prep work is the part that gets much faster and neater for you after you've fumbled through a few. 


These want to be pinned vertically. I can't get clips to hold the fold nice enough for me, so I just be careful of the porcupine effect as I'm working.


Now you can go back and pin the gap just behind the angle. Don't worry about the fullness at the sewing edge. . .


. . . It will lay itself down very nicely because of the bias cut if you use an invisible ladder-type stitching that you can see Nadine show at her tutorial.


I tried to get a shot for you to see how I treat the angles. As the quilt is used, I don't want those folds to get pulled out and then be all ugly-popped. So I stitch each one invisibly shut - front and back. *However* - I was also concerned that pulling stress on twisting scallops might pop stitches at those corners, so I left the outer 1/3 or so unstitched, to allow for a wee bit of give without giving the fold room to pop out. Hopefully you can see here what I'm talking about. I'm sure this is where all the extra stitching time is coming from, but I'm also sure from playing around with an un-secured angle that I will not at all regret this extra care in the stitching. It just gets all messy without it when you manipulate the quilt edge.


So! If you're considering a scalloped edge, leave yourself plenty of time, understand that it's an adventure, and go for it! They're beautiful edgings for the designs that want them, and well worth the time and effort.  Feel free to share with me your own experiences, tips, or ask questions.


FMQ Station:

It's time to get the next party started!!  This is getting pin-basted today. I have chemical sensitivity and some systemic health issues that I protect from carcinogenics like the propellant in spray cans, so I pass up all the basting sprays. 


Hounds' Blues is 60 x 60 inches. I succeeded once again at keeping everything limited to what was already in my stash! I was even able to Frankenstein some Hobbs Heirloom batting pieces together for it. 

I splice them using this overlapped and curvy cutting approach shown by Anne.  I call it "Frankensteining" because I don't buy the iron-on tape - it's easy and quick enough to just whipstitch the joins. I use big stitches, approaching an inch apart and spanning a 1/4 inch either side of the gap. They look like Frankenstein stitches! Or big football stitches. And they go very, very quickly. You just snug it enough to make the gap disappear but not enough to make a ridge. See how hard it is to find that join?  


It likes to pull a little loose when you lift the batting, but just smooth it all snug again when you layer your quilt sandwich. If you baste sufficiently (whatever your favorite method), you will have no pull-away or bunching. Works like a charm.

[I need to add this qualifier: if the quilt is going to have fairly wide-spaced quilting (like 4" apart or so), you'd need to use much closer stitches to keep it more stable. At that point, I'd probably opt for the ease of the iron-on tapes.  ;D]

For myself, I have not had good results zigzagging batting seams in the machine - They like to bunch or stretch, and I find the resulting depression still detectable after the quilt is finished. (Although I'm sure it would disappear completely in something that is hyper-quilted.)  


Piecing Station:

Just started going through my scrap bin, cutting blues and whites into log cabin pieces for the next gift needed. They'll grow up into Run, Kitty, Run, but right now this station does not get priority.


~*~*~*~*~

Linking up at