Hi there, and welcome to this week's landing spot for TGIFF!
It was a clever idea that Laura and M-R had to develop a weekly link-up where the hosting responsibilities are divvied up to lighten the load. And this week it's my turn! If you want to explore Thank Goodness It's Finished Fridays further, here is its mother page: TGIFF.
And please join in on the linky fun at the bottom
if you have a recent finish to show off!! :D
I actually have TWO finishes to report!! ::happy dance:: First, let's have that UFO report, because that sucker's been flying around out there for a whole year.
Marissa's Moment
 |
Yeah - I let her bring Clara along for our latest road trip
since nobody else could accompany us. |
My black-loving, rocker-aspiring (heaven help me!) young teen stopped cold one time while following me through the local quilt store, and wonderingly exclaimed: "I love this!" and held up a very girly pastel charm pack. I don't know which of us was more astonished since it's so completely different from her normal tastes. What was a mother to say, other than, "We better buy it, then, huh!?" So we got 2 charm packs and some companion yardage that called to her - with no idea at all what we wanted to do with it, other than that she wanted it to cover her bed.

I thought and considered, and never saw a pattern that seemed just right, and one night I woke up knowing what I wanted to try to do. The result was a fun pastel coverlet design that actually came out incredibly close to my mental image, with a pillow sham to accompany. Nicknamed "Marissa's Moment of Freakishness," that top was finally finished. But I really wanted to quilt it myself, and it sat another 6 months while I worked on other projects to develop some FMQ skills.
I finally felt brave enough to do the quilting on the sham. Wow! It came out so cool! This is the first time I tried the wool on top of the Hobbs Heirloom, and I love the effect of the double batting with intricate quilting.
 |
| Marissa's Moment Pillow Sham - standard bed size |
I "drew" in grass as I quilted the row of reverse yo-yo flowers. (The yo-yo's each have a little puff of stuffing in them, and since it's her quilt set and she felt strongly about not seeing their belly-button sides, I stitched them on backward.) The hearts are surrounded with little loopy "petals".
At the top, after stitching in the ditch to separate each pinwheel (I just did the big squares, not every blade), I drew in elongated heart-shaped petals on the background pieces so that the prints would puff nicely. Then I did a pretty successful attempt at quilting "lace" above and below the row.
(You can see better on the back how I SID'd the pinwheels. Perfect effect altogether.)
Between the pinwheels and the flowers, I did a medium-sized meander with butterflies and a dragonfly appearing here and there.
I also quilted in a secret message. I thought it would take her forever to find it, but when I showed her the quilted sham top so she could choose the perfect buttons, her keen eyes saw that message right away. And she smiled oh-so-poignantly. :D
 |
| In case you need help picking out that message. ;D |
When all was quilted, I stitched sweet buttons on each pinwheel center. Wish they looked as good in the photos as in real life. Their luster is gorgeously pearlescent. I had left the quilting tails nice and long to use them before tucking tails away.
I used Dawn's Quilt Corner Pillow Sham Tutorial to assemble the sham for a standard bed pillow. It screamed out that it wanted ruffles in the sweet pink print that matches the tiny flowers on that diagonal stripe print, or maybe eyelet ruffles, but I was commanded "NO RUFFLES!" I did sneak in some pretty satin ivory cording when I sewed the envelope together. I mean - it had to have *something*! And it turned out great. None of the ruffles that I'd want on it, but perfect for her own taste, and that's what matters most.
Now that I'm confident I can do the quilting I want, her quilt is up next on the fmq table! I'm only going to use one layer of batting, though, to keep better drape. While I *love* the effect of Tuscany on top of Heirloom, it's best reserved for pillows, table-toppers, and wallhangings because it's just not pliant. Going to try out the Tuscany wool alone since it's "washable." It was a little over the top paired with minky (see the second finish, below), but I expect an entirely different effect with a cotton back and denser quilting. (Still considering colored threads for some parts (like the butterflies) so they'll show up more on the prints, but at least I'm not scared of working with it.
 |
Just a peek of the center of the quilt
(it's all assembled since this shot was snapped) |
~*~ My second finish this week ~*~
A Snowy Day in the Woods
 |
| 43" x 48" |
I love this snuggly quilt! And it's MINE! I've been sewing over a year for other people and working on UFO after UFO. Well, this was a fresh break - NOT a UFO (yes! I bought a brand new kit that called out to me). And not long and laborious to make. And staying with me. :D
 |
| Horrid winter lighting - this one is better at showing the colors and fabrics. |
I had fun with its quilting. Made some snowflake templates with Golden Threads papers and placed those as I pin-basted the layers together. I connected those with meandering that has what are supposed to be snowballs here and there.
I stitched-in-the-ditch for the narrow stop border (using my walking foot - no way am I ready to do SID with free motion!!). Had a hard time deciding what to do in the outer border until doodles during a CSI episode turned into some motifs suggestive of a snowball fight. Fun. :) So I used those.
I wanted a luscious minky back, so I did that. I wanted to try the Tuscany Wool batt, so I did that. Wow, it's puffy! Wouldn't want that for everything, but for this sofa snuggler intended for January days, it's nice. And it's a fair chore to push that combination around with FMQ! I haven't washed it yet. With the wool, the washing is a bit more finicky, so I want to wait until it's used a while. I'll let y'all know how that goes, but it'll be a few weeks.

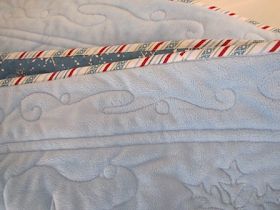
And I ***love*** the binding. Such fun stripes on the bias like a fancy blue-and-red candy cane. I was really fussy about matching up the stripes as I joined strips together, and I'm thrilled with the end result. No glaring glitches here and there. With a minky back, there's no way I'm attaching binding my normal way. I almost always greatly prefer to sew it onto the front with my walking foot, then turn it to the back and stitch it down by hand. YOU do that with minky if you want. ;D Instead, I sew it on to the back, then topstitched it carefully on the front by machine, all with my walking foot. Nice result. If this were a fancier quilt, I'd consider hand-stitching to the front side, but for this quilt that's not necessary at all.
 |
| This shot actually shows the powder blue really true. |
And Koko approves of the minky - I couldn't get him to move for the photo shoot of Marissa's sham!
Hope you have a great weekend, and please check out the finishes other folks are sharing below. We'd love to have you link a post of your own up if you have a recent finish to share!!


